|
How do I track my ads on the major ad networks?
ClickMagick allows you to quickly and easily track all your ads on any ad network. And unlike your ad networks, we provide you with truly accurate data and actionable stats to help you optimize and scale like a pro.
Ad tracking is based on industry-standard UTM parameters, so if you’re already using UTMs you may be good to go …
But either way we strongly recommend you read the short article below to learn how UTMs work with ClickMagick:
What are UTM Parameters and how do I use them?
Then, as long as you’ve already set up your click and conversion tracking, just select your ad network below and we’ll show you how to upgrade your tracking in just a few minutes ...
We generally recommend using a Tracking Template for your UTMs, but the downside with Google when doing this is that they only provide Campaign, Ad Group and Ad IDs for your stats, as opposed to the actual names.
If you only have a few active ads running at any given time it’s really not a big deal, but if you prefer to see your actual Campaign, Ad Set and Ad names in ClickMagick, we’ll start out by showing you how to do that.
And if you do want to use a Tracking Template so you don’t have to update each ad, there’s more on that below as well.
Step 1 – Build a UTM-Powered Ad URL
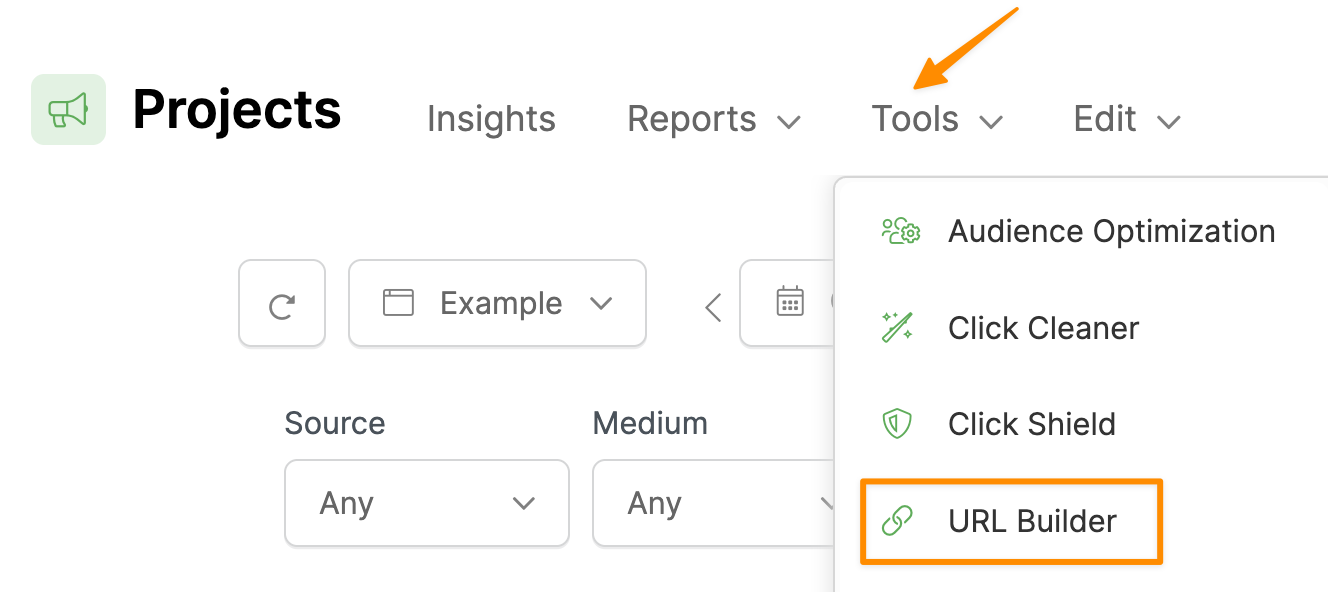
Click Projects at the top of any page, then click on the Tools menu and select URL Builder.
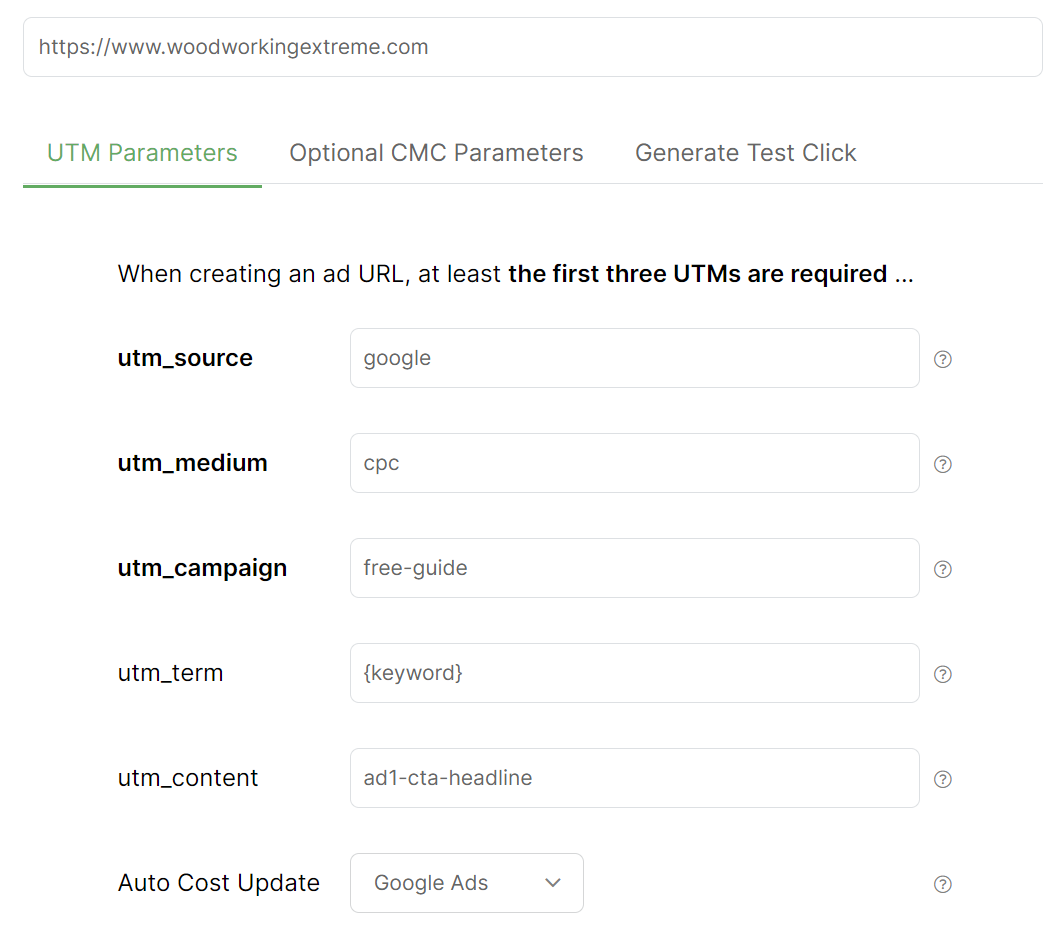
Enter the URL of your landing page, and then simply enter the UTM values you want to use to track this ad. You must always enter values for at least
utm_source, utm_medium, and utm_campaign.The
utm_term and utm_content parameters are optional, although you'll generally want to use all five UTMs.For Google Ads you’ll generally want to set
utm_term={keyword} and utm_content to the name of your ad.{keyword} is a dynamic “token” that will be replaced with the actual keyword that triggered your ad, and you can learn more about tokens at the end of this article.And if you plan on integrating ClickMagick with Google, you should go ahead and select Google Ads under Auto Cost Update as well. Once you’ve done the integration, this will automatically pull in your exact ad costs from Google.
Step 2 - Use your UTM-Powered URL in your Google Ad
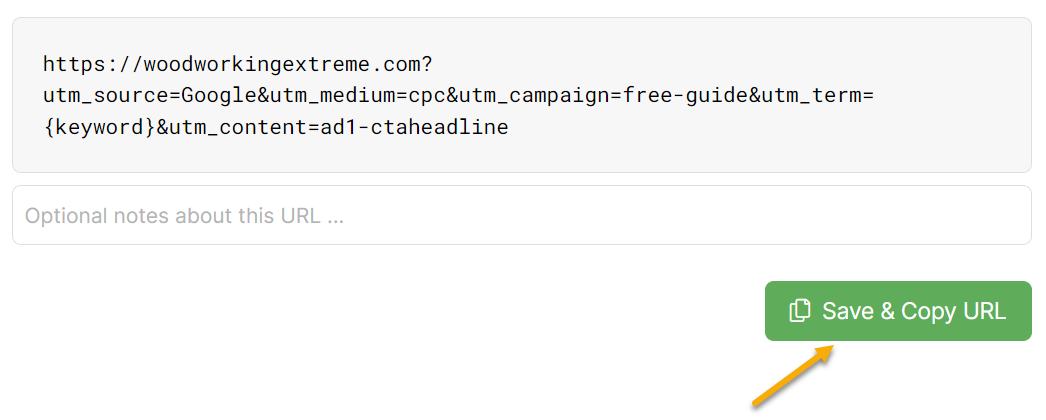
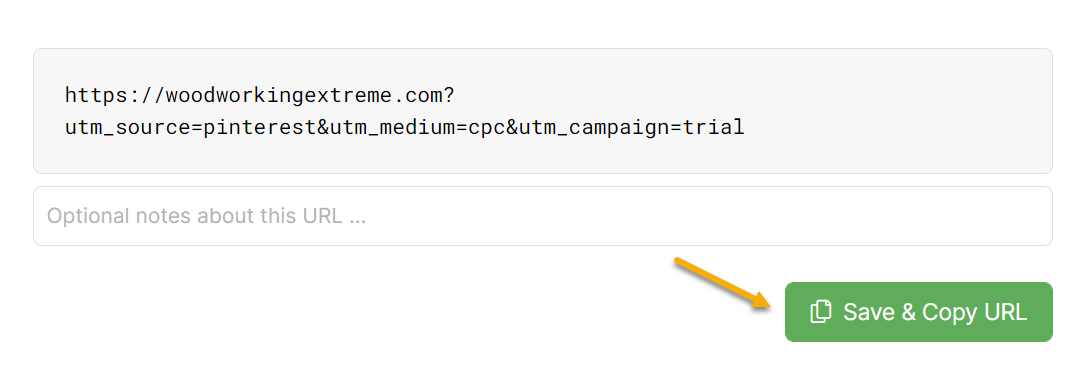
Click on the “Save & Copy URL” button to copy your UTM-powered link to your clipboard.
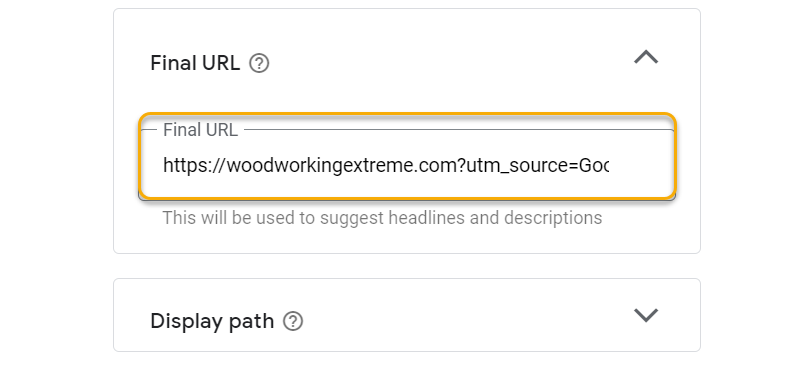
Finally, paste this modified link into the "Final URL" field for your Google ad.
Using Dynamic Ad Network Tokens
Ad network “tokens” are dynamic placeholders that can be used as UTM values, in place of a static value. These tokens are then replaced with real values by your ad network each time your ad is clicked. Learn more in the article below:
What are dynamic ad network tokens and how do I use them?
Tracking Lots of Ads using Tracking Templates
The process above describes creating a UTM-powered URL for each of your ads. If you just have a handful of ads it’s quick and easy, with the added benefit of seeing your actual Campaign, Ad Set and Ad names in ClickMagick.
If you have lots of ads, and don’t mind seeing IDs in your stats e.g. 481737423982 vs. spring-sale-ad, you can use a Tracking Template at the Campaign level so you don’t have to update the URL for each ad. Learn more below:
What is the best way to track lots of ads?
Tracking your Ad Spend
There are three different ways to track your ad spend. You can learn more about that here:
How do I track my Ad Spend?
Here’s how to set up Facebook tracking using a Tracking Template. This keeps your UTMs in the recommended, standardized format – and it’s quick and easy because you just set it up once for all your ads.
Step 1 – Grab your Facebook Tracking Template
Click Projects at the top of any page, then click on the Tools menu and select URL Builder.

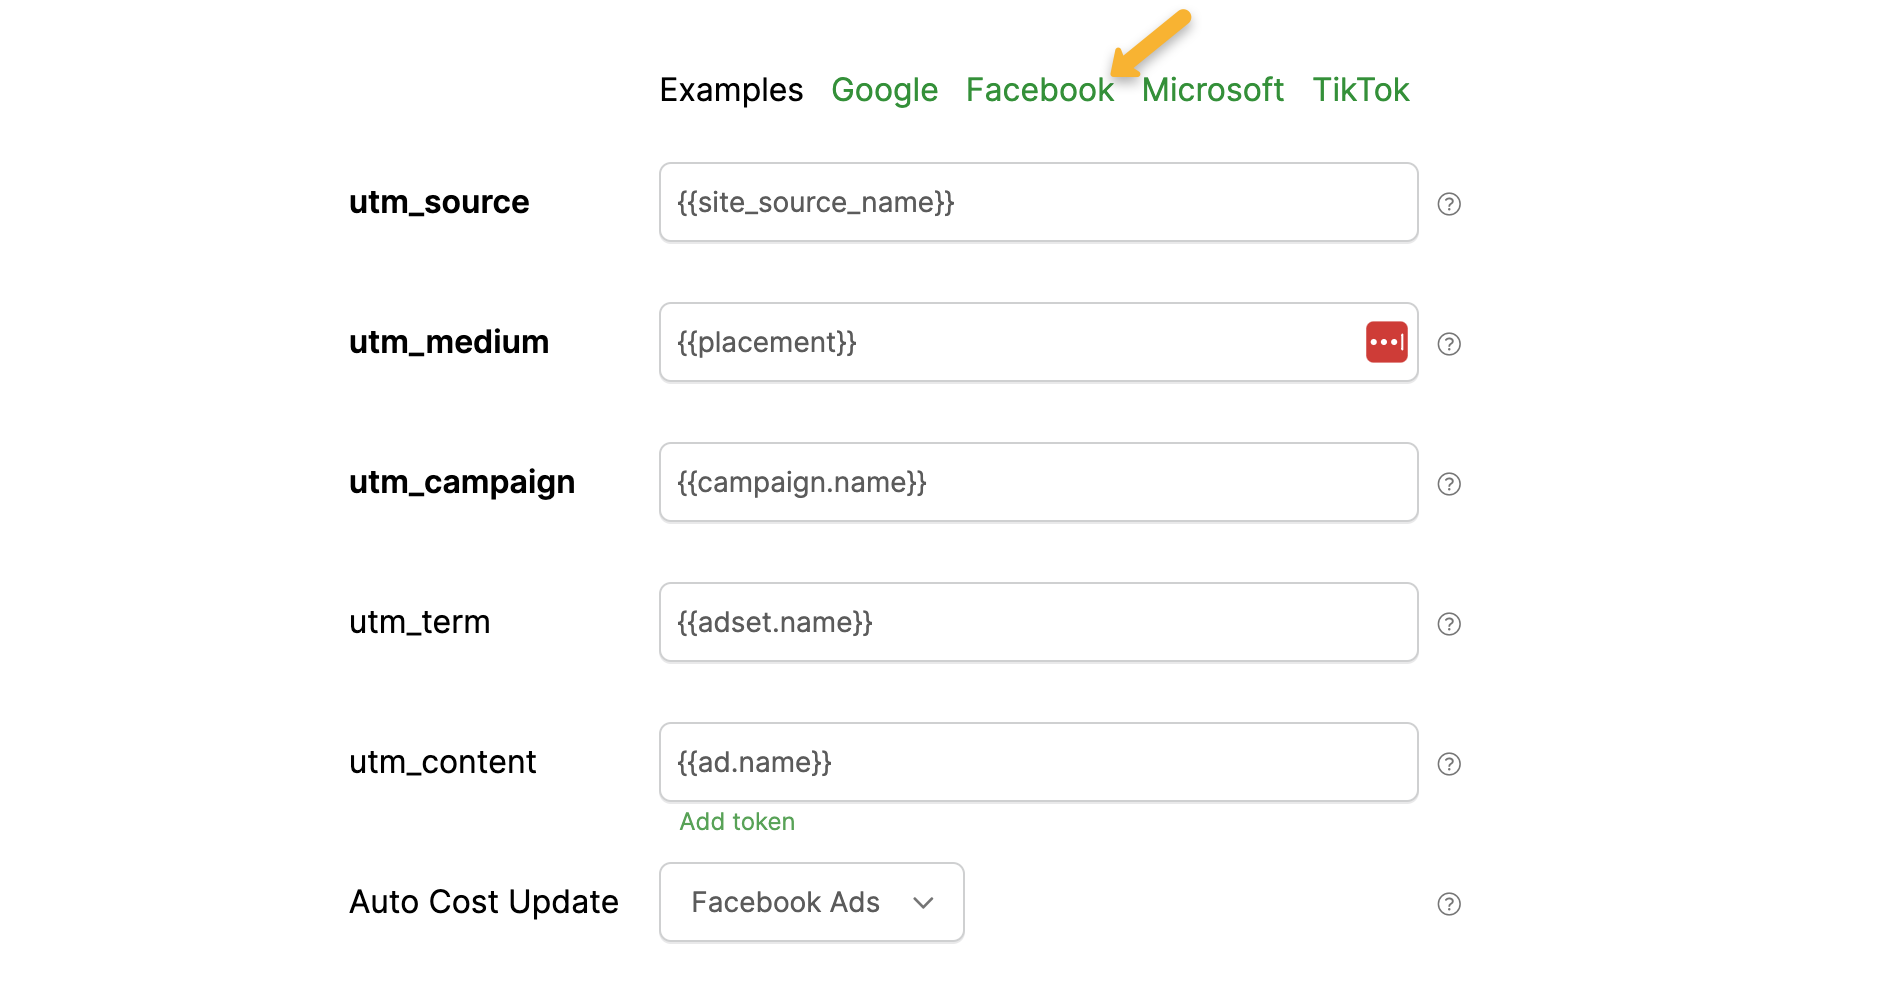
Click the Tracking Templates button in the top right hand corner.

Click “Facebook” to auto-fill your parameters.
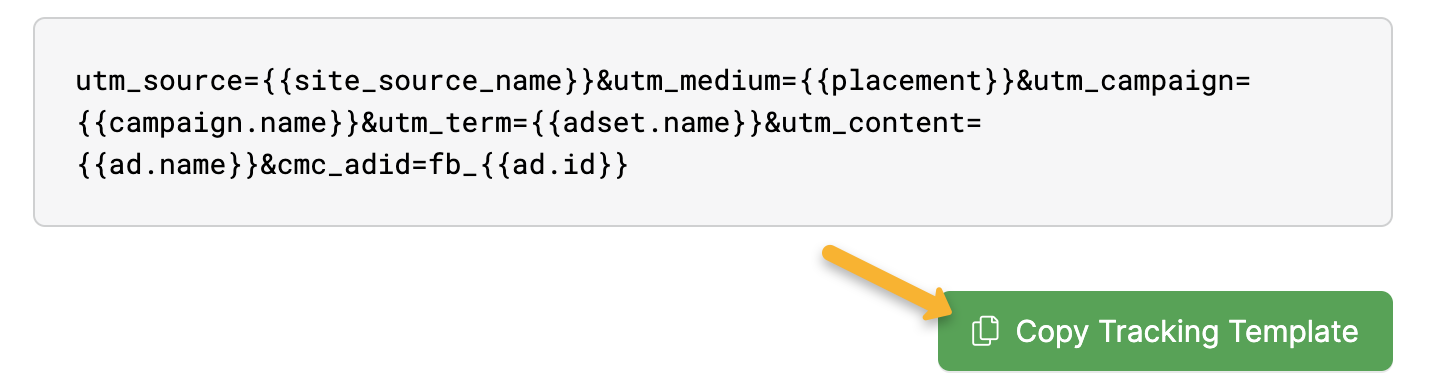
Next, click the “Copy Tracking Template” button.
Step 2 - Add your URL Parameters to your Facebook Ads
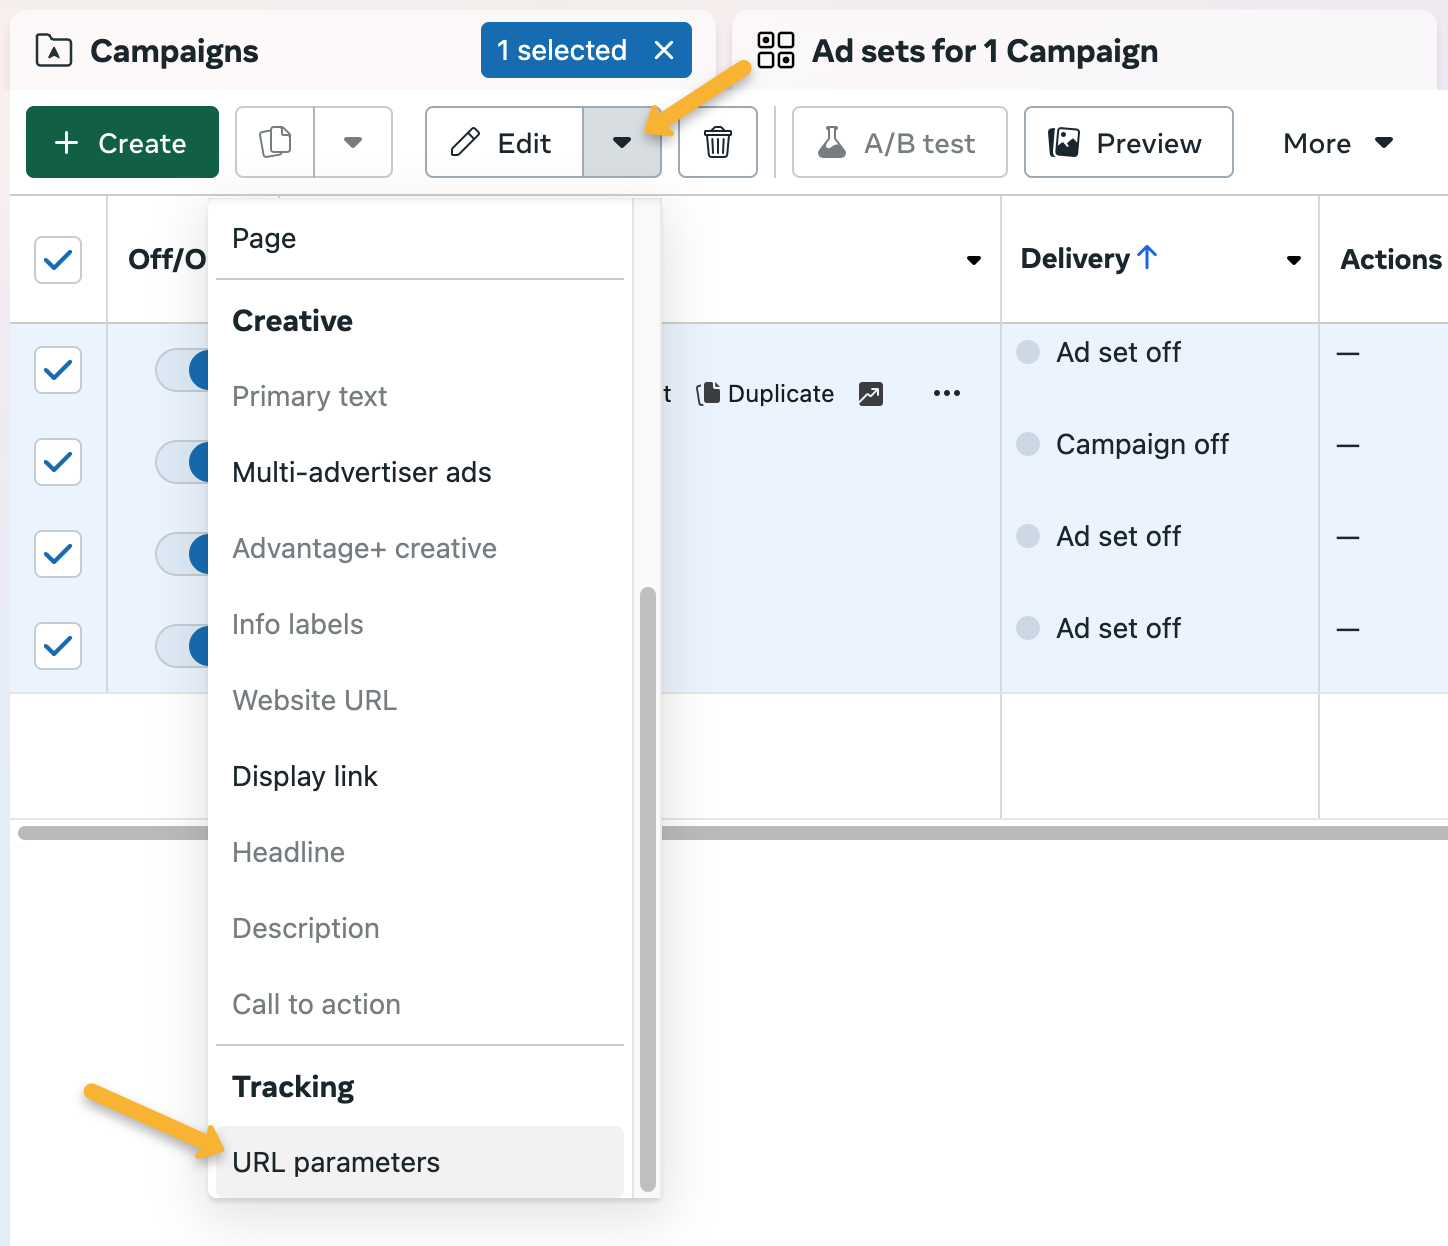
Head over to Facebook Ads Manager and select all the ads you want to track. Next, click the drop-down menu next to “Edit”, then select “URL parameters”.
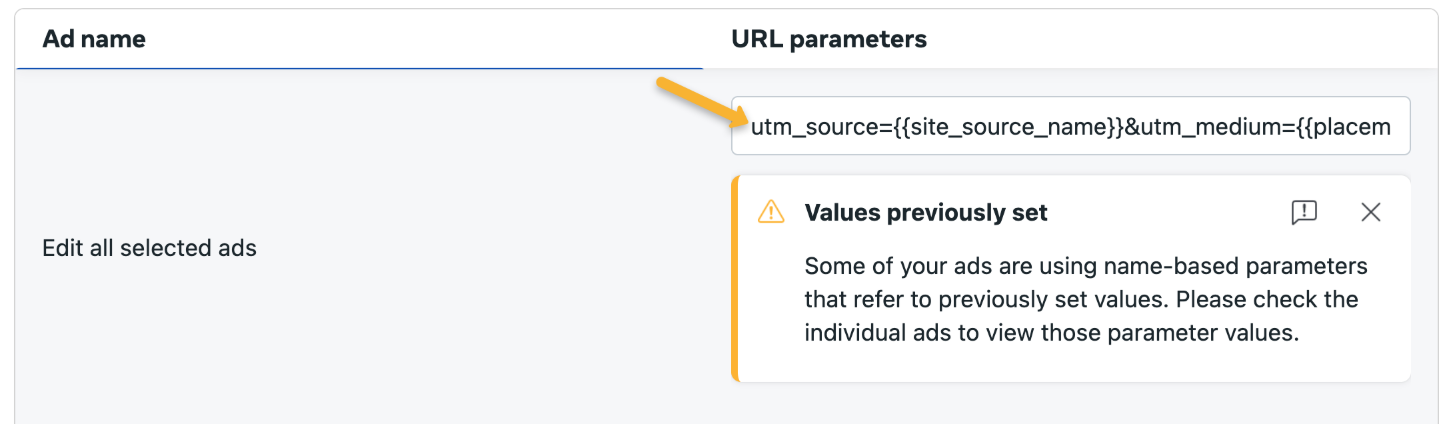
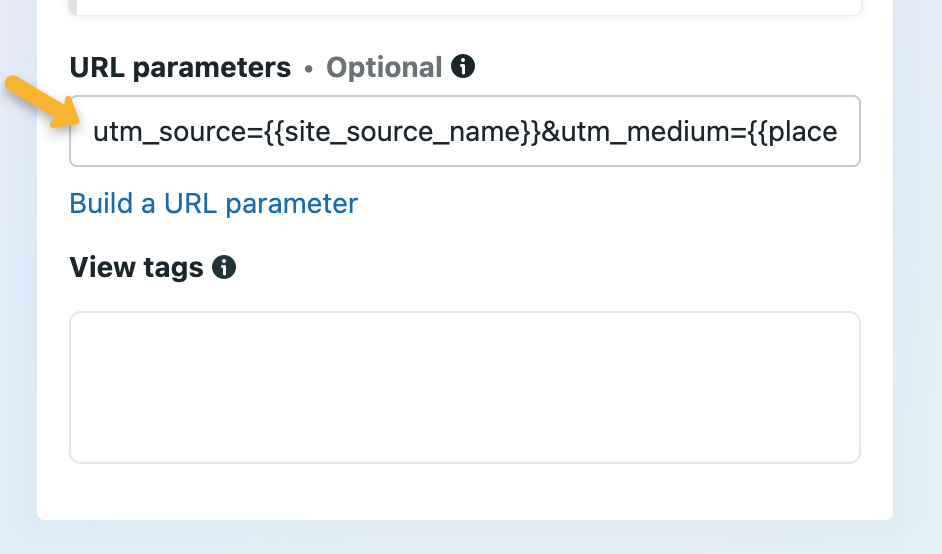
Finally, paste in the template you copied earlier into the “URL parameters” section, next to “Edit all selected ads”.
If you just need to add tracking to a single ad, edit your ad and scroll down to the bottom. Paste the template into the “URL parameters” section.
All that’s left to do is hit save and publish your changes!
When using this template, here’s how your data will show in your ClickMagick reports:
| Source | “fb” for Facebook, “ig” for Instagram, “msg” for Messenger, or “an” for the Audience Network. |
| Medium | placement where the ad appeared, e.g. desktop feed, mobile feed, messenger inbox, etc. |
| Campaign | the name of the campaign |
| Term | the name of the ad set |
| Content | the name of the ad |
Note: We recommend using the method above for ease and consistency. However, if you’re a more advanced user that understands UTM parameters, you can still manually add any UTMs you want using the URL Builder instead.
Tracking your Ad Spend
There are three different ways to track your ad spend. You can learn more about that here:
How do I track my Ad Spend?
We generally recommend using a Tracking Template for your UTMs, but the downside with Microsoft Ads when doing this is that they only provide Campaign, Ad Group and Ad IDs for your stats, as opposed to the actual names.
If you only have a few active ads running at any given time it’s really not a big deal, but if you prefer to see your actual Campaign, Ad Set and Ad names in ClickMagick, we’ll start out by showing you how to do that.
And if you do want to use a Tracking Template so you don’t have to update each ad, there’s more on that below as well.
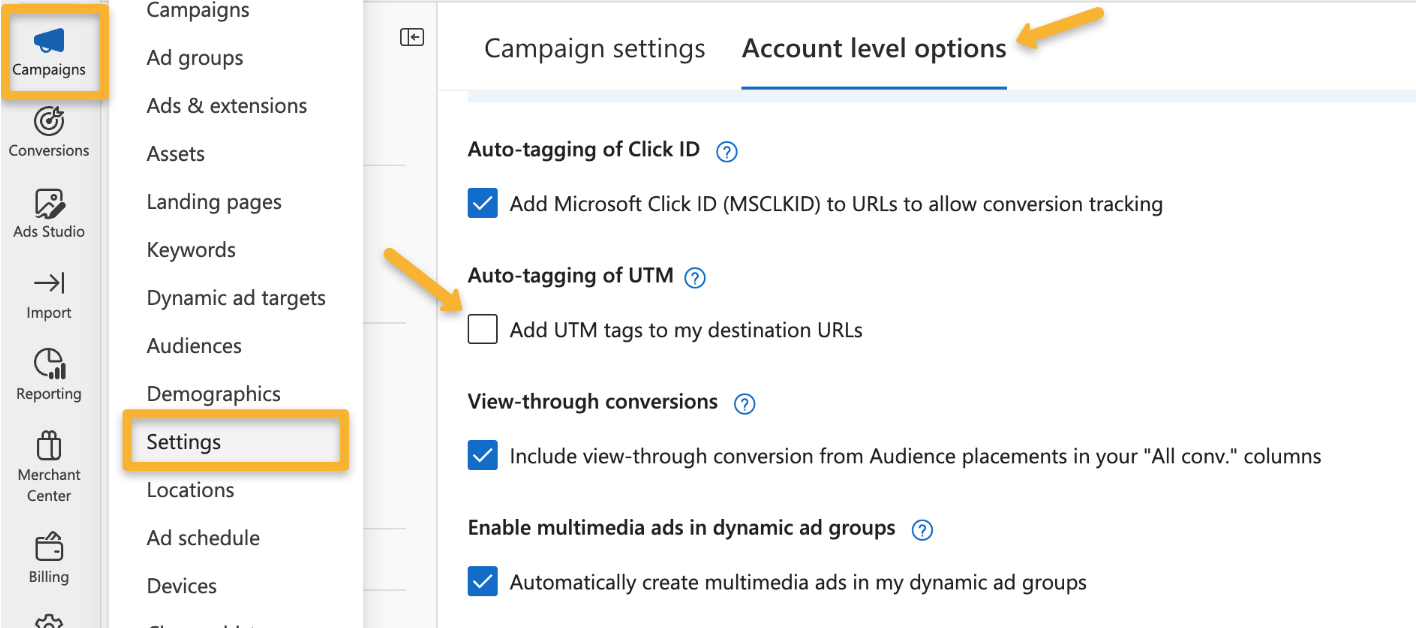
Step 1 – Make sure “Auto-tagging of UTM” is turned off
In Microsoft Ads, go to “Campaigns”, then “Settings”, then “Account Level Options” and turn off “Auto Tagging of UTM”.
Step 2 – Build a UTM-Powered Ad URL
Click the Projects link at the top of any page, then click on the Tools menu and select URL Builder.

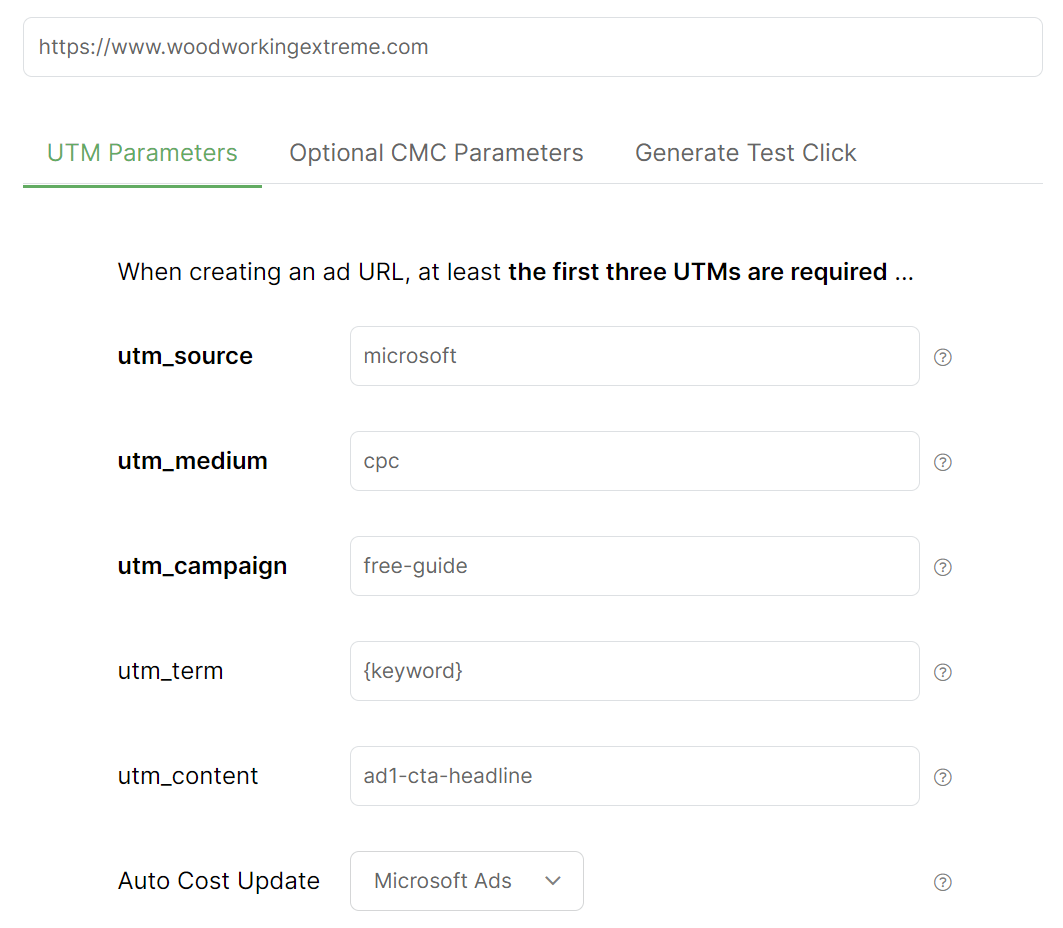
Enter the URL of your landing page, and then simply enter the UTM values you want to use to track this ad. You must always enter values for at least
utm_source, utm_medium, and utm_campaign.The
utm_term and utm_content parameters are optional, although you'll generally want to use all five UTMs.For Microsoft Ads you’ll generally want to set
utm_term={keyword} and utm_content to the name of your ad.{keyword} is a dynamic “token” that will be replaced with the actual keyword that triggered your ad, and you can learn more about tokens at the end of this article.And if you plan on integrating ClickMagick with Microsoft, you should go ahead and select Microsoft Ads under Auto Cost Update as well. Once you’ve done the integration, this will automatically pull in your exact ad costs from Microsoft.
Step 3 – Use your UTM-Powered URL in your Microsoft Ad
Click on the “Save & Copy URL” button to copy your UTM-powered link to your clipboard.
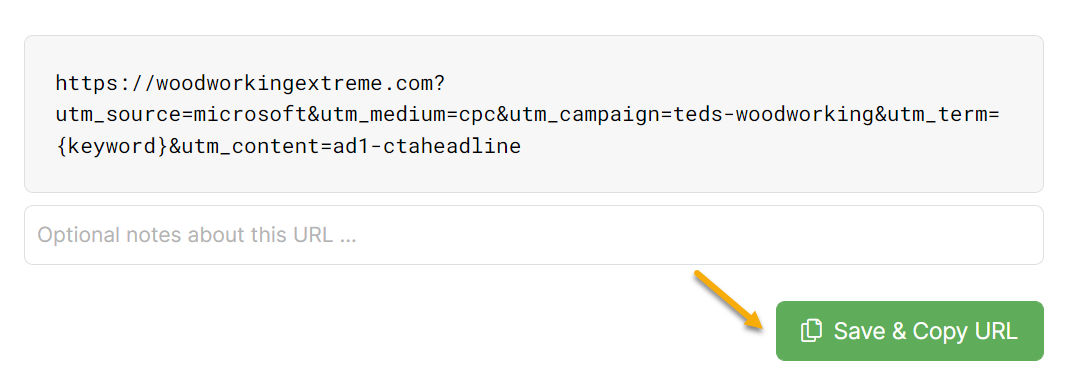
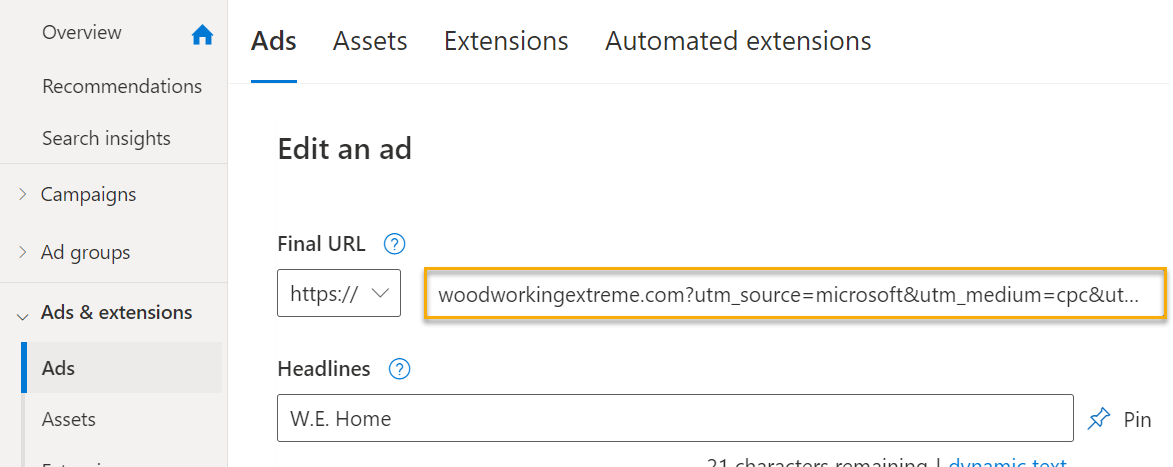
Finally, paste this modified link into the "Final URL" field for your Microsoft ad:
Using Dynamic Ad Network Tokens
Ad network “tokens” are dynamic placeholders that can be used as UTM values, in place of a static value. These tokens are then replaced with real values by your ad network each time your ad is clicked. Learn more in the article below:
What are dynamic ad network tokens and how do I use them?
Tracking Lots of Ads using Tracking Templates
The process above describes creating a UTM-powered URL for each of your ads. If you just have a handful of ads it’s quick and easy, with the added benefit of seeing your actual Campaign, Ad Set and Ad names in ClickMagick.
If you have lots of ads, and don’t mind seeing IDs in your stats e.g. 481737423982 vs. spring-sale-ad, you can use a Tracking Template at the Campaign level so you don’t have to update the URL for each ad. Learn more below:
What is the best way to track lots of ads?
Tracking your Ad Spend
There are three different ways to track your ad spend. You can learn more about that here:
How do I track my Ad Spend?
TikTok does not support Tracking Templates, so you’ll need to add tracking parameters to each ad.
First we’ll show you the basic steps to add tracking parameters to an ad, then we’ll introduce you to dynamic tokens which allow you to use the exact same parameters for each ad which can simplify things if you have lots of ads.
Step 1 – Build a UTM-Powered Ad URL
Click the Projects link at the top of any page, then click on the Tools menu and select URL Builder.

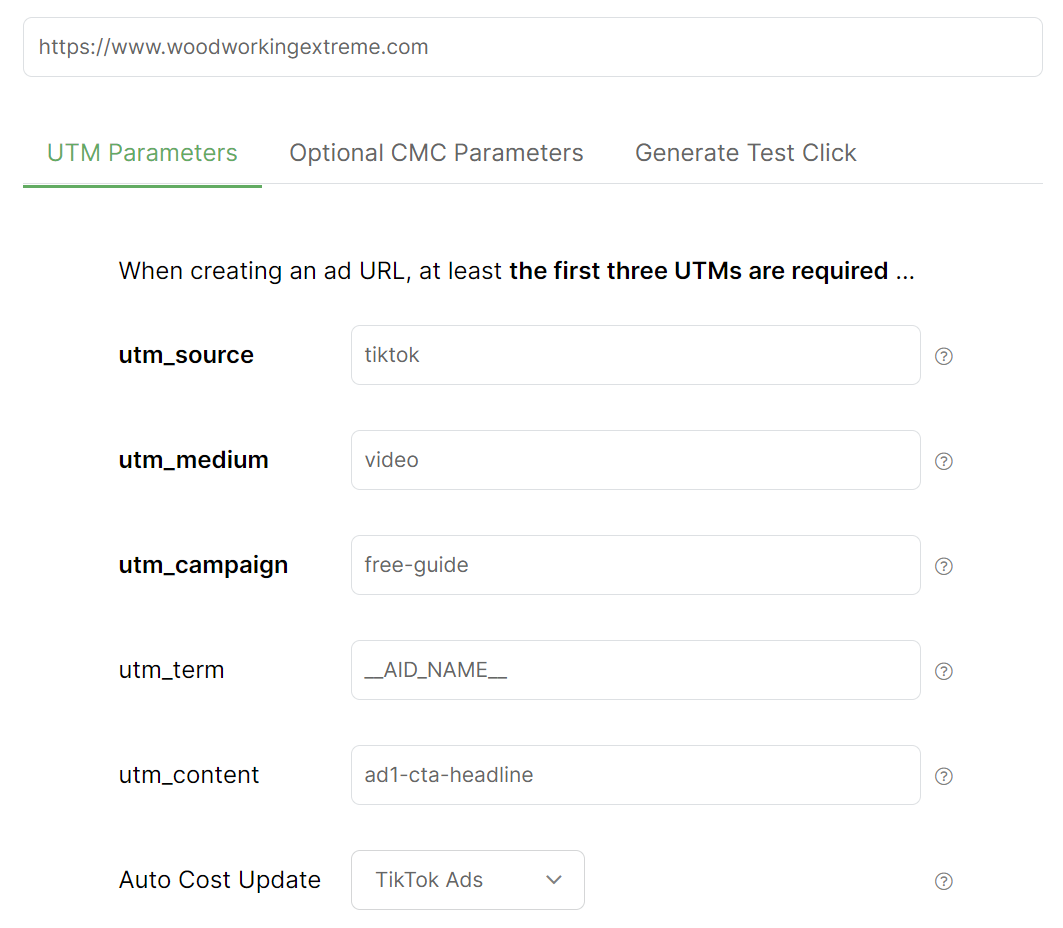
Enter the URL of your landing page, and then simply enter the UTM values you want to use to track this ad. You must always enter values for at least
utm_source, utm_medium, and utm_campaign.The
utm_term and utm_content parameters are optional, although you'll generally want to use all five UTMs.For TikTok Ads you may want to set
utm_term=__AID_NAME__ and utm_content to the name of your ad.__AID_NAME__ is a dynamic “token” that will be replaced with the name of the ad group that generated the click, and you can learn more about tokens at the end of this article.And if you plan on integrating ClickMagick with TikTok, you should go ahead and select TikTok Ads under Auto Cost Update as well. Once you’ve done the integration, this will automatically pull in your exact ad costs from TikTok.
Step 2 - Use your UTM-Powered URL in your TikTok Ad
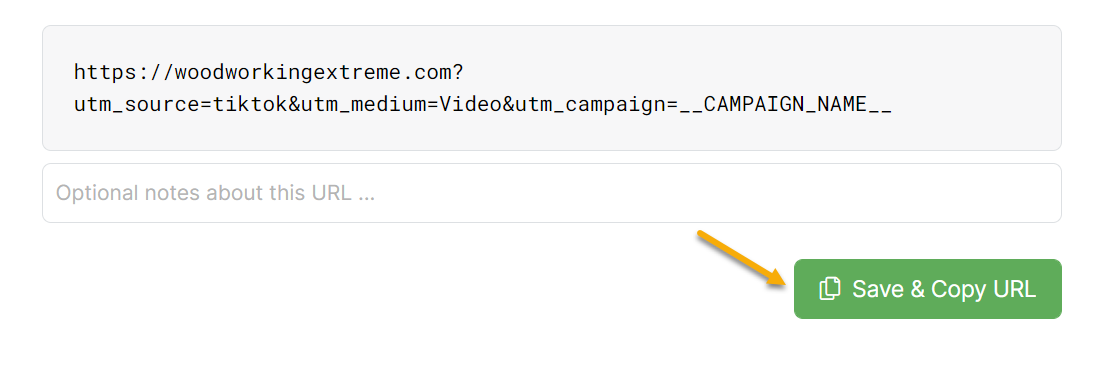
Click on the “Save & Copy URL” button to copy your UTM-powered link to your clipboard.
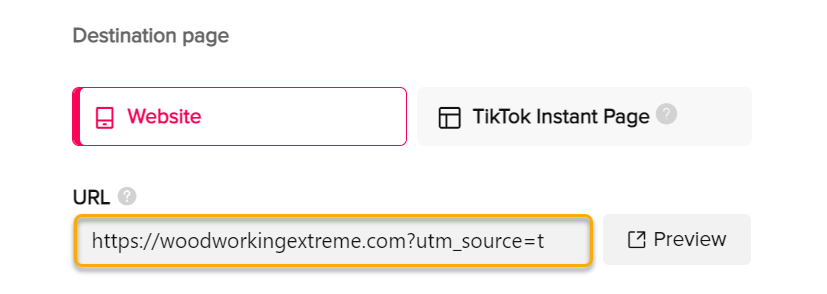
Finally, paste this modified link into your TikTok ad:
Using Dynamic Ad Network Tokens
Ad network “tokens” are dynamic placeholders that can be used as UTM values, in place of a static value. These tokens are then replaced with real values by your ad network each time your ad is clicked.
Since the values are dynamically generated you can use the same tokens to supply the UTMs for all your ads, which simplifies things a bit if you have lots of ads. Learn more in the article below:
How do I use a Tracking Template to track lots of ads?
Tracking your Ad Spend
There are three different ways to track your ad spend. You can learn more about that here:
How do I track my Ad Spend?
Pinterest does not support Tracking Templates, so you’ll need to add tracking parameters to each ad.
First we’ll show you the basic steps to add tracking parameters to an ad, then we’ll introduce you to dynamic tokens which allow you to use the exact same parameters for each ad which can simplify things if you have lots of ads.
Step 1 – Build a UTM-Powered Ad URL
Click the Projects link at the top of any page, then click on the Tools menu and select URL Builder.

Enter the URL of your landing page, and then simply enter the UTM values you want to use to track this ad. You must always enter values for at least
utm_source, utm_medium, and utm_campaign.The
utm_term and utm_content parameters are optional, although you'll generally want to use all five UTMs.For Pinterest Ads you may want to set
utm_term={keyword} and utm_content to the name of your ad.{keyword} is a dynamic “token” that will be replaced with the actual keyword that triggered your ad, and you can learn more about tokens at the end of this article.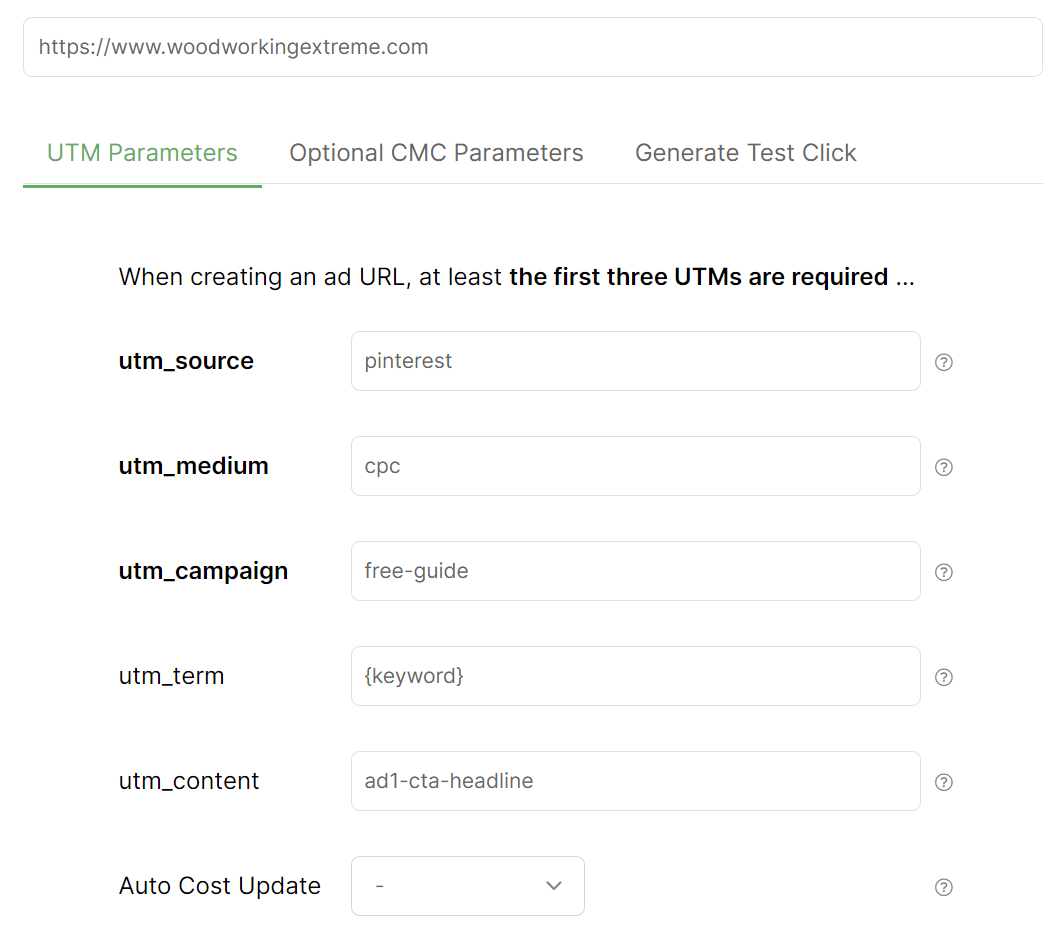
Step 2 – Use your UTM-Powered URL in your Pinterest Ad
Click on the “Save & Copy URL” button to copy your UTM-powered link to your clipboard.
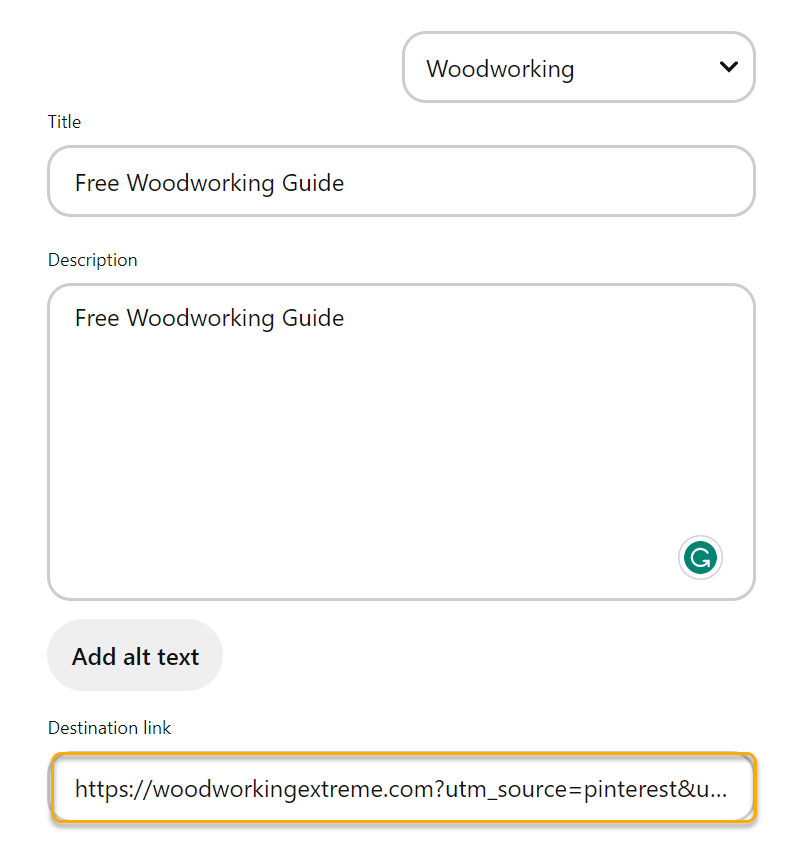
Finally, paste this modified link into the "Destination Link" field for your Pinterest ad:
Using Dynamic Ad Network Tokens
Ad network “tokens” are dynamic placeholders that can be used as UTM values, in place of a static value. These tokens are then replaced with real values by your ad network each time your ad is clicked.
Since the values are dynamically generated you can use the same tokens to supply the UTMs for all your ads, which simplifies things a bit if you have lots of ads. Learn more in the article below:
How do I use a Tracking Template to track lots of ads?
Tracking your Ad Spend
There are three different ways to track your ad spend. You can learn more about that here:
How do I track my Ad Spend?
First we’ll show you the basic steps to add tracking parameters to an ad, then we’ll introduce you to dynamic tokens which allow you to use the exact same parameters for each ad which can simplify things if you have lots of ads.
Step 1 – Build a UTM-Powered Ad URL
Click the Projects link at the top of any page, then click on the Tools menu and select URL Builder.

Enter the URL of your landing page, and then simply enter the UTM values you want to use to track this ad. You must always enter values for at least
utm_source, utm_medium, and utm_campaign.The
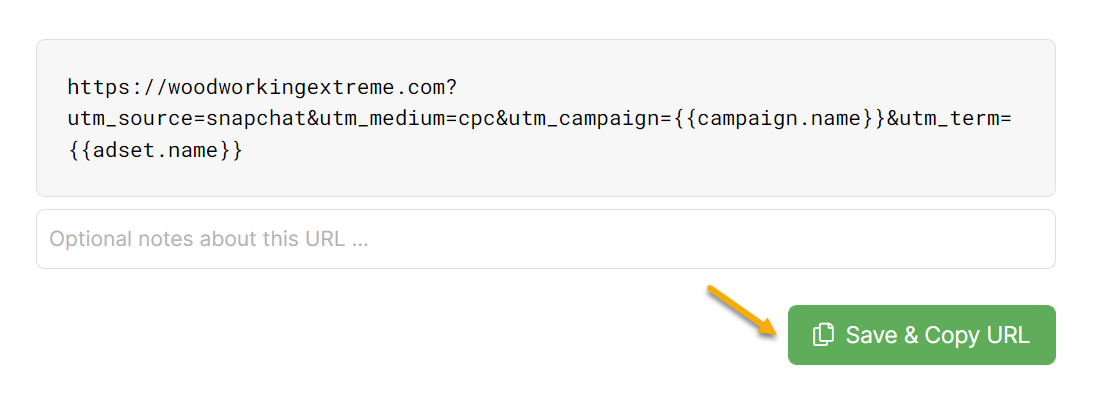
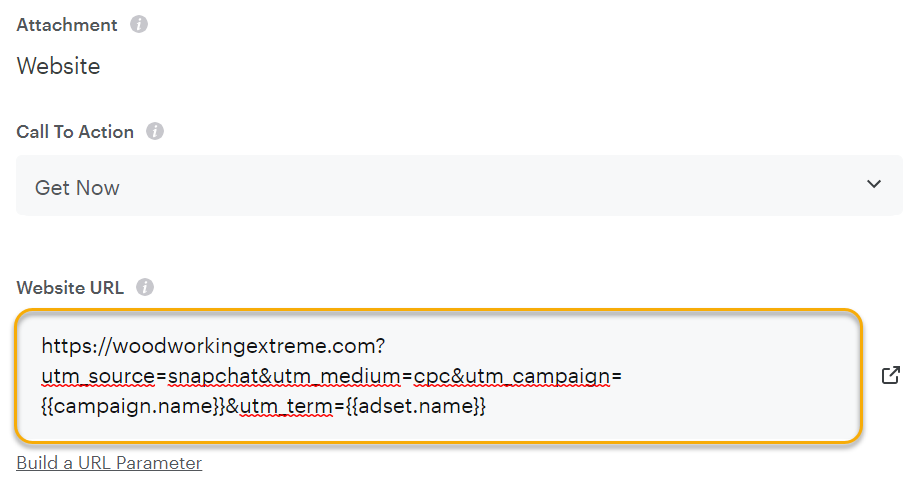
utm_term and utm_content parameters are optional, although you'll generally want to use all five UTMs.For Snapchat Ads you may want to set
utm_term={{adSet.name}} and utm_content to the name of your ad.{{adSet.name}} is a dynamic “token” that will be replaced with the name of the ad set that triggered your ad, and you can learn more about tokens at the end of this article.
Step 2 – Use your UTM-Powered URL in your Snapchat Ad
Click on the “Save & Copy URL” button to copy your UTM-powered link to your clipboard.
Finally, paste this modified link into the "Website URL" field for your Snapchat ad:
Using Dynamic Ad Network Tokens
Ad network “tokens” are dynamic placeholders that can be used as UTM values, in place of a static value. These tokens are then replaced with real values by your ad network each time your ad is clicked.
Since the values are dynamically generated you can use the same tokens to supply the UTMs for all your ads, which simplifies things a bit if you have lots of ads. Learn more in the article below:
How do I use a Tracking Template to track lots of ads?
Tracking your Ad Spend
There are three different ways to track your ad spend. You can learn more about that here:
How do I track my Ad Spend?
Unfortunately, X Ads doesn’t support Tracking Templates or any dynamic tokens at all, which means you’ll have to manually add UTM tracking parameters to each ad. Here’s how ...
Step 1 – Build a UTM-Powered Ad URL
Click the Projects link at the top of any page, then click on the Tools menu and select URL Builder.

Enter the URL of your landing page, and then simply enter the UTM values you want to use to track this ad. You must always enter values for at least
utm_source, utm_medium, and utm_campaign.The
utm_term and utm_content parameters are optional, although you'll generally use at least four or all five UTMs.For X Ads you’ll generally leave
utm_term blank and set utm_content to the name of your ad.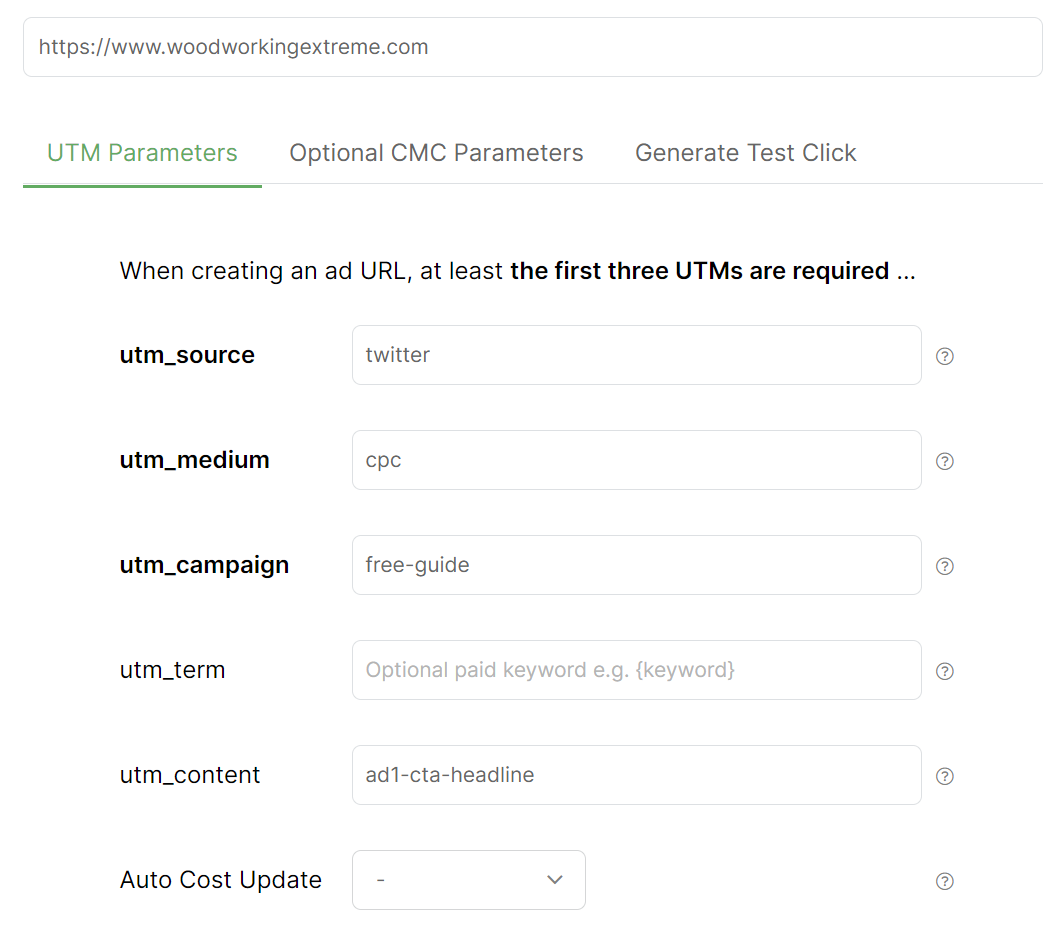
Step 2 – (Optional) Create a Shortened Smart Link for Your UTM-Powered URL
Unlike other ad networks, X Ads doesn’t have the concept of a “Display URL” and “Final URL”. You provide them just a single URL that is displayed in your ad and this is the exact URL visitors are sent to.
Because of this, you'll probably want to create a “short link” for your UTM-powered URL using a Smart Link.
This way you can create a nice looking URL that’ll be displayed in your ad, and when users click your ad they’ll be redirected to your actual “tracking URL” with your UTM parameters.
You'll also probably want to make sure to set up and use a custom domain for your Smart Links as well, which you can learn about at the link below:
How do I set up a secure custom domain in ClickMagick?
With all of that being said, here’s how to create a short “pretty link” using a Smart Link …
Click on the “Save & Copy URL” button to save your UTM-powered URL to the URL Manager.
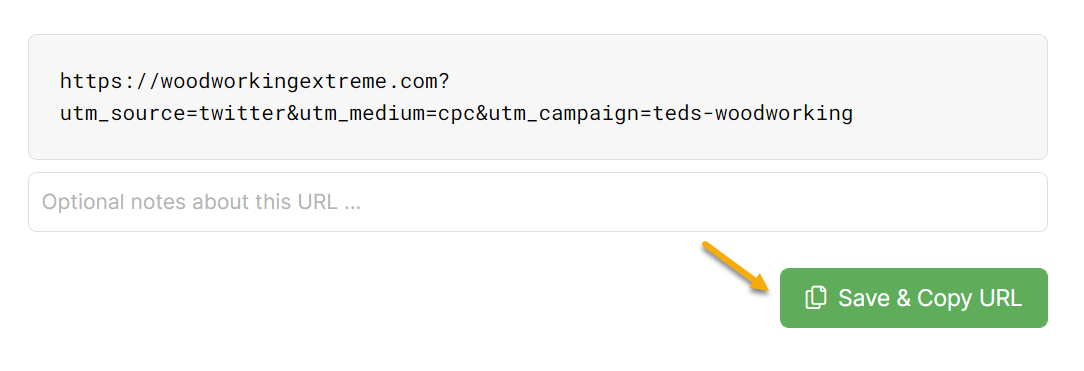
Next you’ll want to navigate to the URL Manager ...

Then click the link icon to the right of the UTM-powered URL you want to create a short link for.

Add a Link Name (for your reference only), select your custom tracking domain, and add the Link Slug (the part after
link-domain.com) and then click on “Create Smart Link”.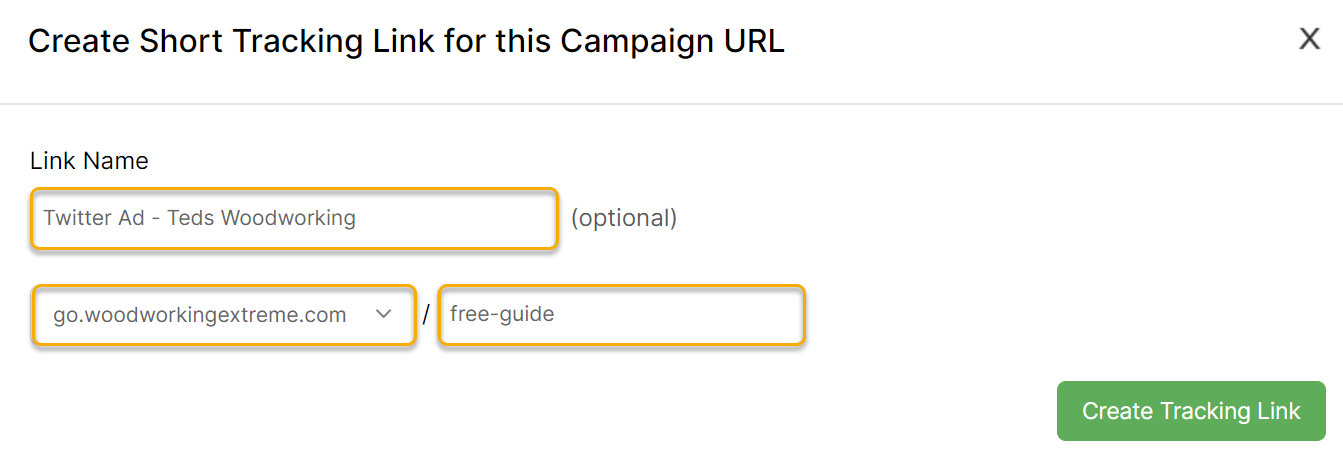
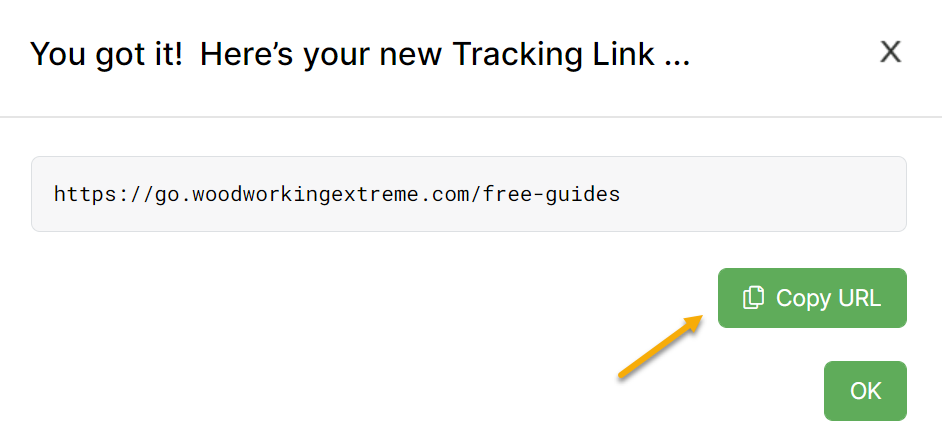
Now, click on “Copy URL” to copy this new short link.
Note: If you ever need to find this Smart Link again, just go to Smart Links and navigate to your “Project Short Links” link group.

Step 3 – Use your UTM-Powered URL or short link in your X Ad
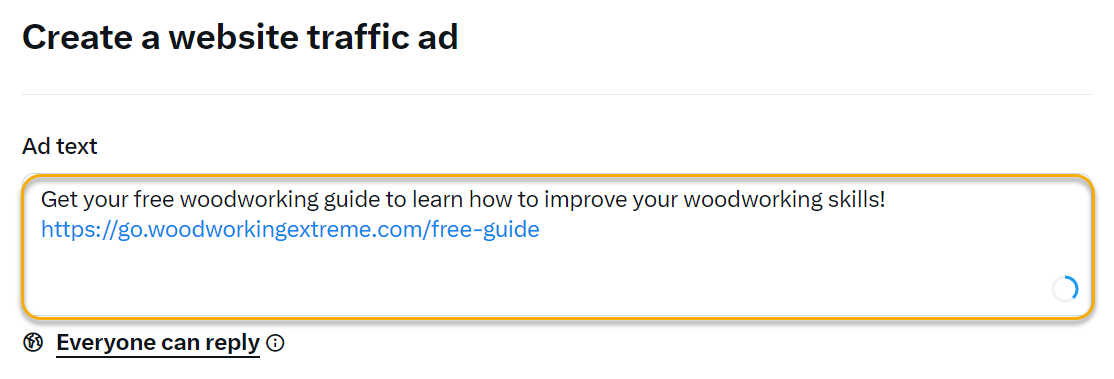
Finally, paste your UTM-powered URL or your “pretty” short link URL into your X ad.
Tracking your Ad Spend
There are three different ways to track your ad spend. You can learn more about that here:
How do I track my Ad Spend?
There are two ways to run ads on Instagram ...
Method 1 – Boosting Posts within the Instagram App
Boosting an Instagram post is simple – just add your post with the UTM-powered URL you want to promote and click the “Boost post" button. The only way to do this is on your phone from within the app.
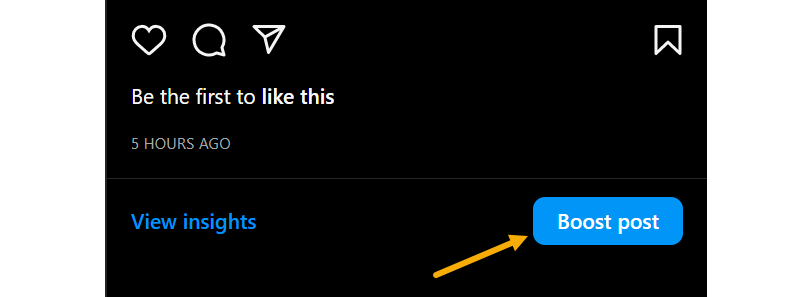
If you don’t see the “Boost post” button, you probably still need to convert your Instagram account to a Business account.
To do that, just follow the steps in this article here:
How to Switch Your Account to Instagram for Business
Method 2 – Manage your ads in Facebook Ads Manager
To manage your Instagram ads in Facebook Ads Manager, you would need to create a Facebook Ads account.
As you are creating your campaign, you would need to head over to your campaign ad set level and select the specific Instagram placement you want to target from there.
If you want to ONLY promote on Instagram for example, you would go to the ad set level, select “Manual Placements”, and deselect every option except for Instagram.
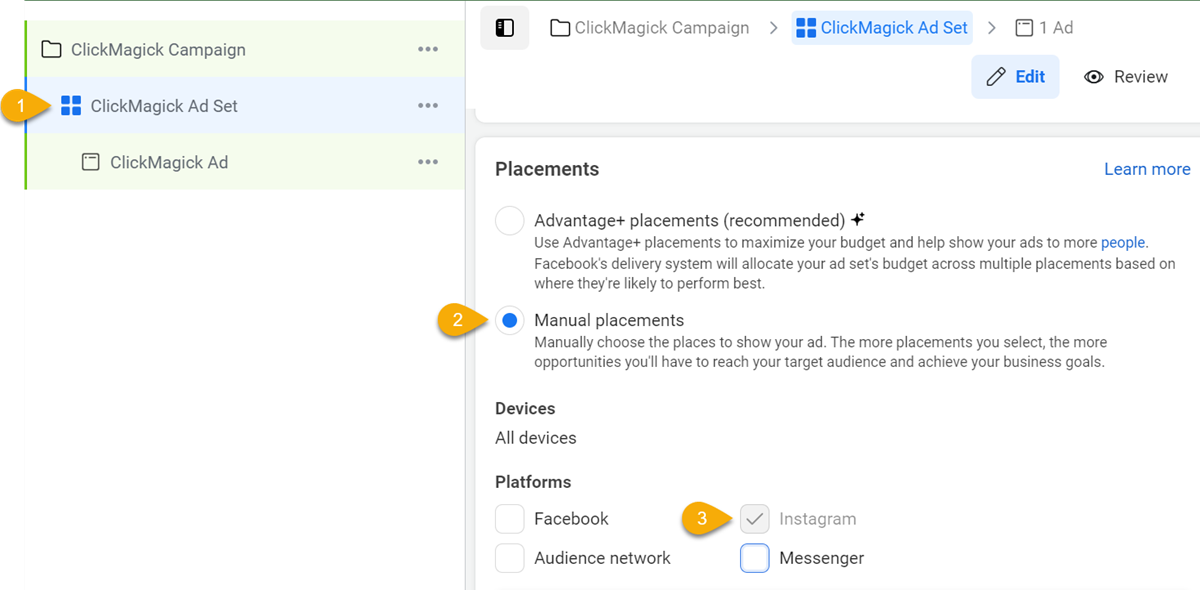
When you scroll down, you would then be able to edit your specific Instagram placements – Instagram Feed, Instagram Explore, and Instagram Stories:
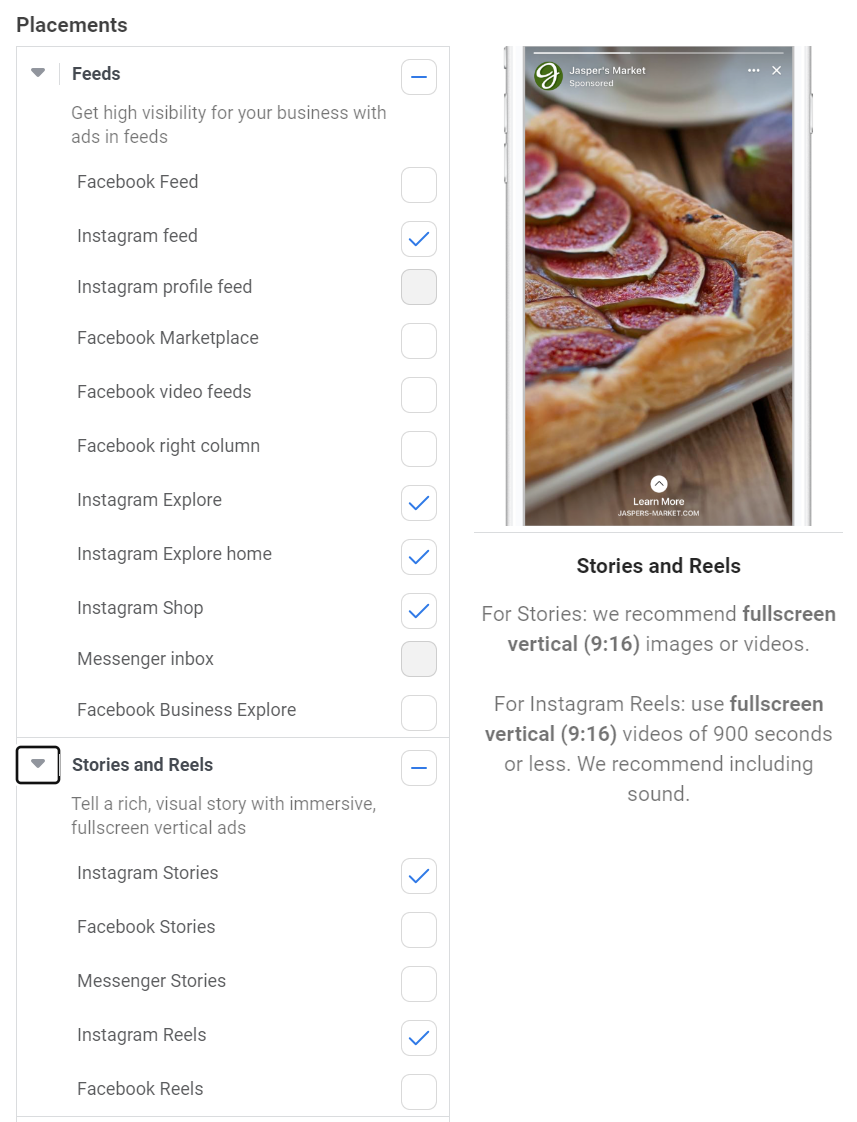
After you determine exactly where you want to show your ads, you would then just follow the rest of the steps in the Facebook Ads section of this article.
Tracking your Ad Spend
There are three different ways to track your ad spend. You can learn more about that here:
How do I track my Ad Spend?
Reddit does not support Tracking Templates, so you’ll need to add tracking parameters to each ad.
First we’ll show you the basic steps to add tracking parameters to an ad, then we’ll introduce you to dynamic tokens which allow you to use the exact same parameters for each ad which can simplify things if you have lots of ads.
Step 1 – Build a UTM-Powered Ad URL
Click the Projects link at the top of any page, then click on the Tools menu and select URL Builder.

Enter the URL of your landing page, and then simply enter the UTM values you want to use to track this ad. You must always enter values for at least
utm_source, utm_medium, and utm_campaign.The
utm_term and utm_content parameters are optional, although you'll generally want to use all five UTMs.For Reddit Ads you’ll generally want to set
utm_term={{ADGROUP_NAME}} and utm_content={{AD_NAME}} to track the ad group and ad names.{{ADGROUP_NAME}} and {{AD_NAME}} are dynamic “tokens” that will be replaced with the actual ad and ad group names. You can learn more about tokens at the end of this article.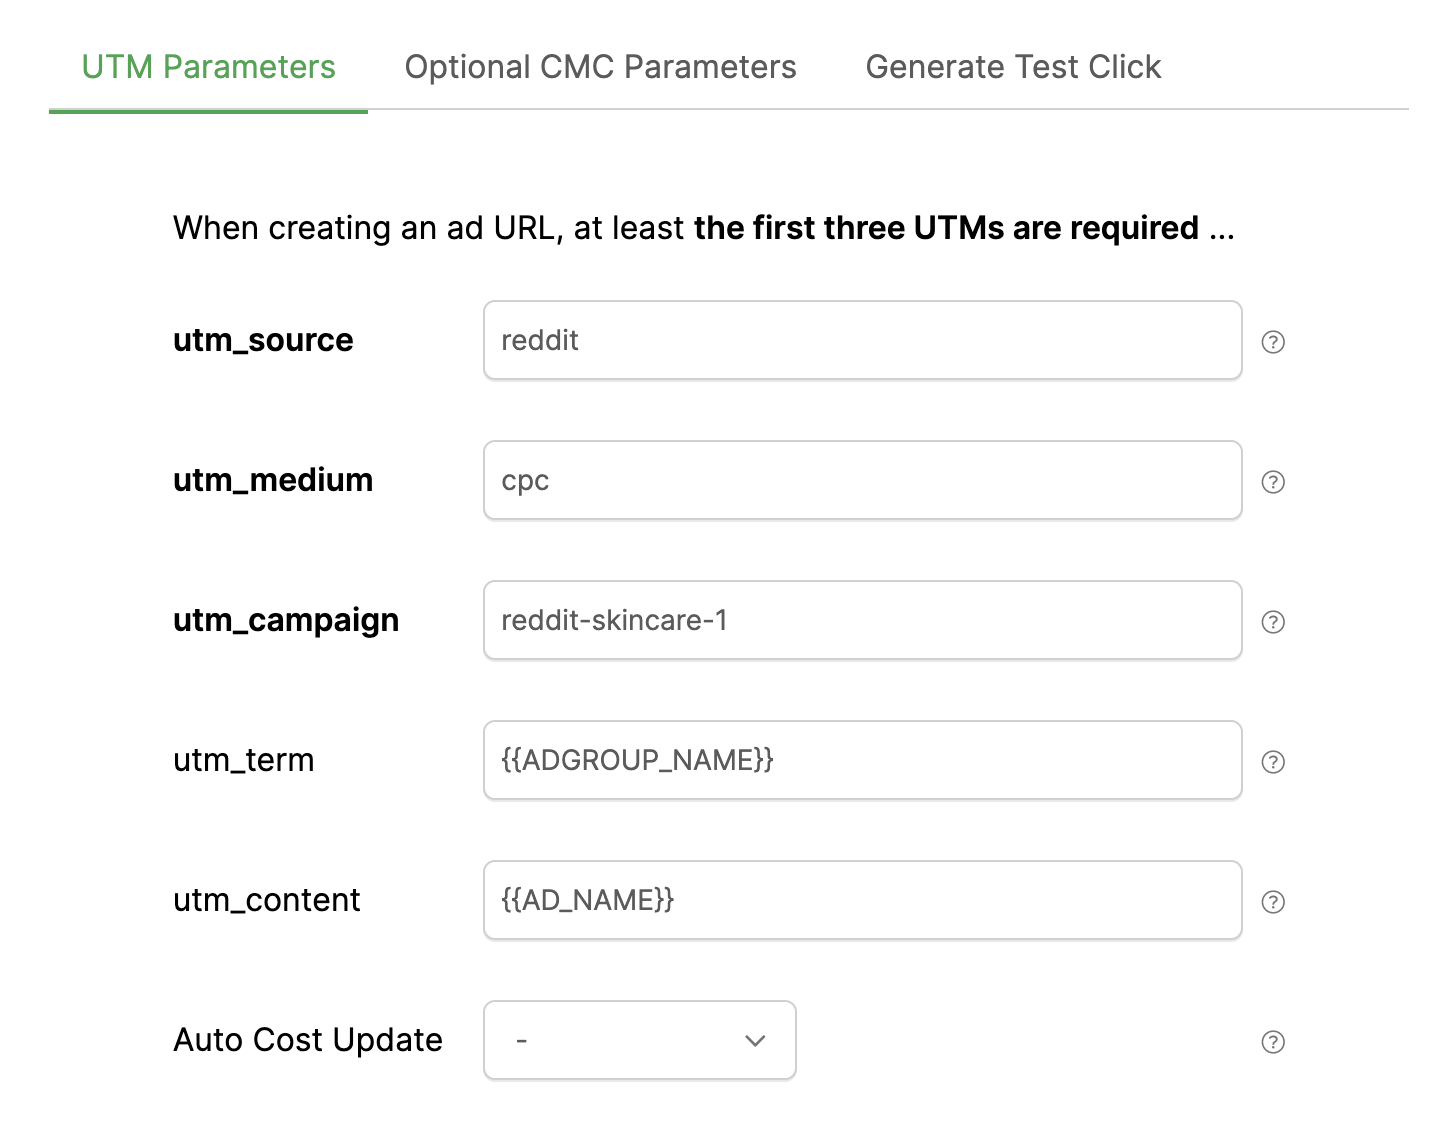
Step 2 - Use your UTM-Powered URL in your Reddit Ad
Click on the “Save & Copy URL” button to copy your UTM-powered link to your clipboard.
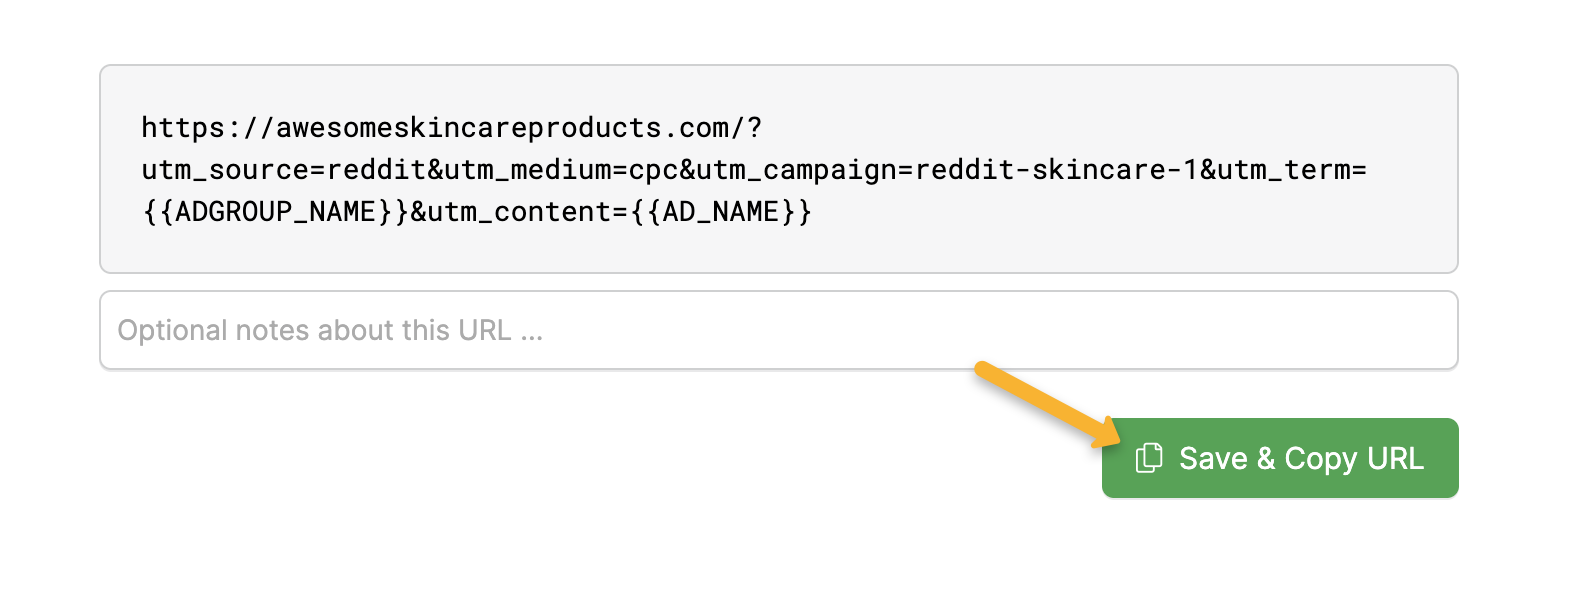
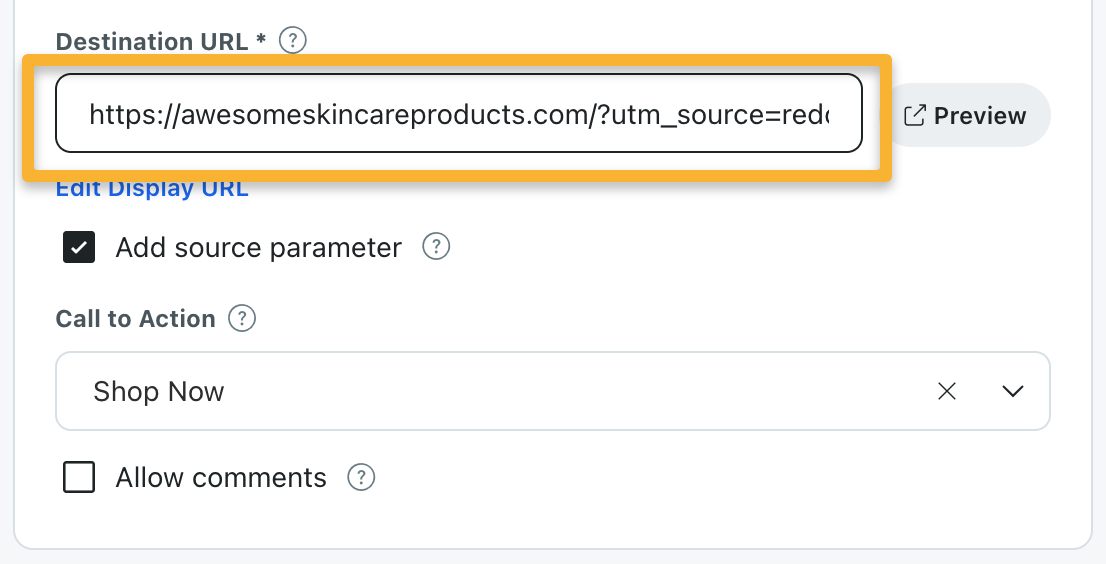
Finally, paste this modified link into the "Destination URL" field for your Reddit ad. Leave the “Add source parameter” box checked.
Using Dynamic Ad Network Tokens
Ad network “tokens” are dynamic placeholders that can be used as UTM values, in place of a static value. These tokens are then replaced with real values by your ad network each time your ad is clicked.
Since the values are dynamically generated you can use the same tokens to supply the UTMs for all your ads, which simplifies things a bit if you have lots of ads. Learn more in the article below:
How do I use a Tracking Template to track lots of ads?
Tracking your Ad Spend
There are three different ways to track your ad spend. You can learn more about that here:
How do I track my Ad Spend?
We generally recommend using a Tracking Template for your UTMs, but the downside with LinkedIn when doing this is that they only provide Ad IDs for your stats, as opposed to the actual ad names.
If you only have a few active ads running at any given time it’s really not a big deal, but if you prefer to see your actual Ad names in ClickMagick, we’ll start out by showing you how to do that.
And if you do want to use a Tracking Template so you don’t have to update each ad, there’s more on that below as well.
Step 1 – Build a UTM-Powered Ad URL
Click the Projects link at the top of any page, then click on the Tools menu and select URL Builder.

Enter the URL of your landing page, and then simply enter the UTM values you want to use to track this ad. You must always enter values for at least
utm_source, utm_medium, and utm_campaign.The
utm_term and utm_content parameters are optional, although you'll generally want to use all five UTMs.For LinkedIn Ads you’ll generally want to set
utm_campaign={{CAMPAIGN_NAME}} and utm_content to the name of your ad.{{CAMPAIGN_NAME}} is a dynamic “token” that will be replaced with the actual campaign name that triggered your ad, and you can learn more about tokens at the end of this article.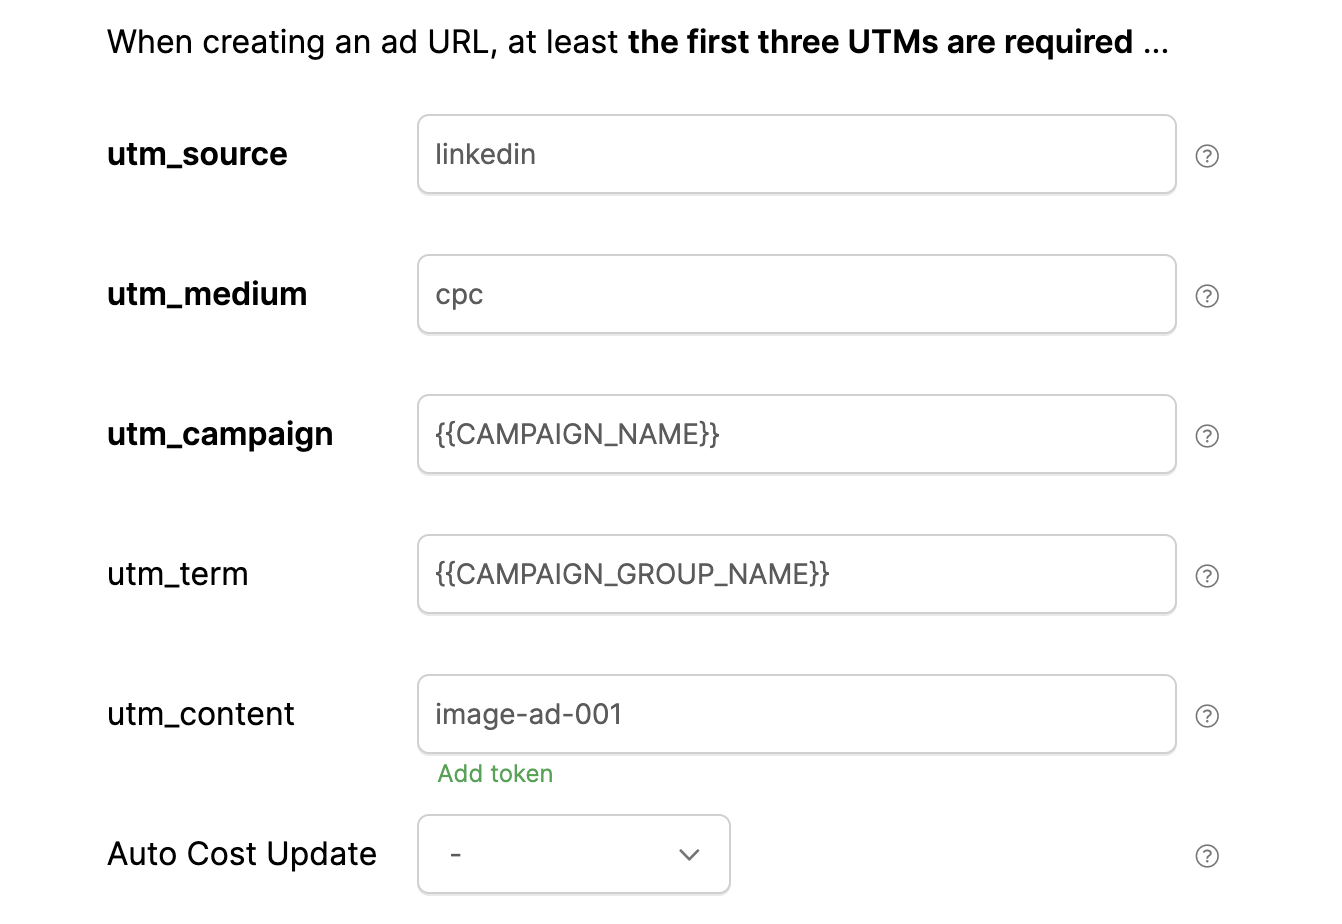
Step 2 - Use your UTM-Powered URL in your LinkedIn Ad
Click on the “Save & Copy URL” button to copy your UTM-powered link to your clipboard.
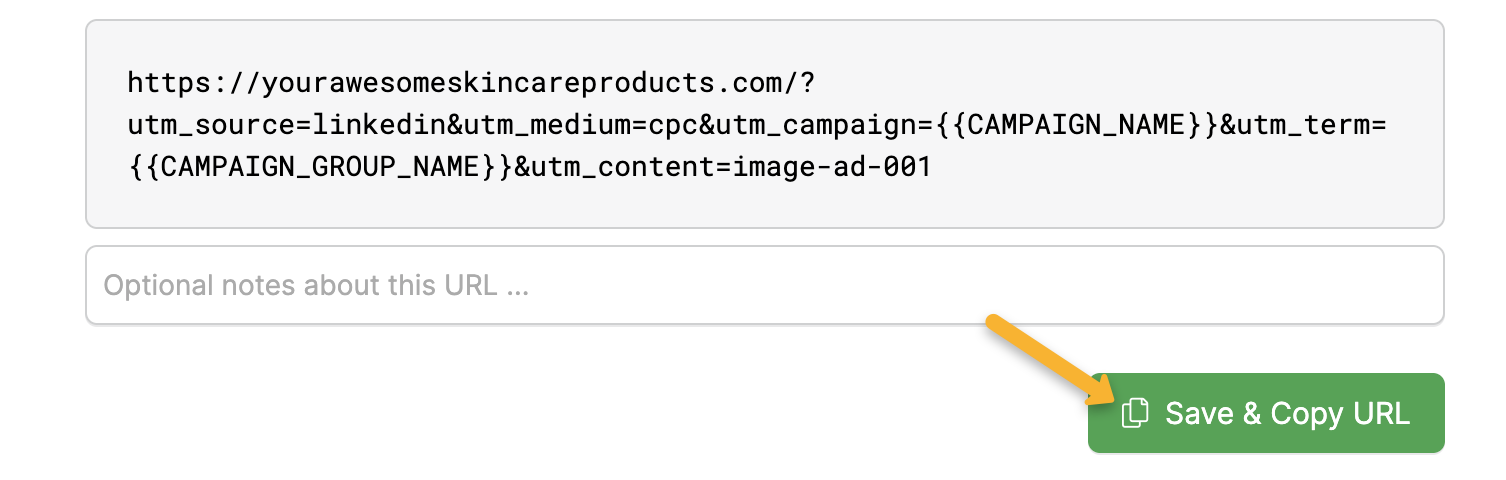
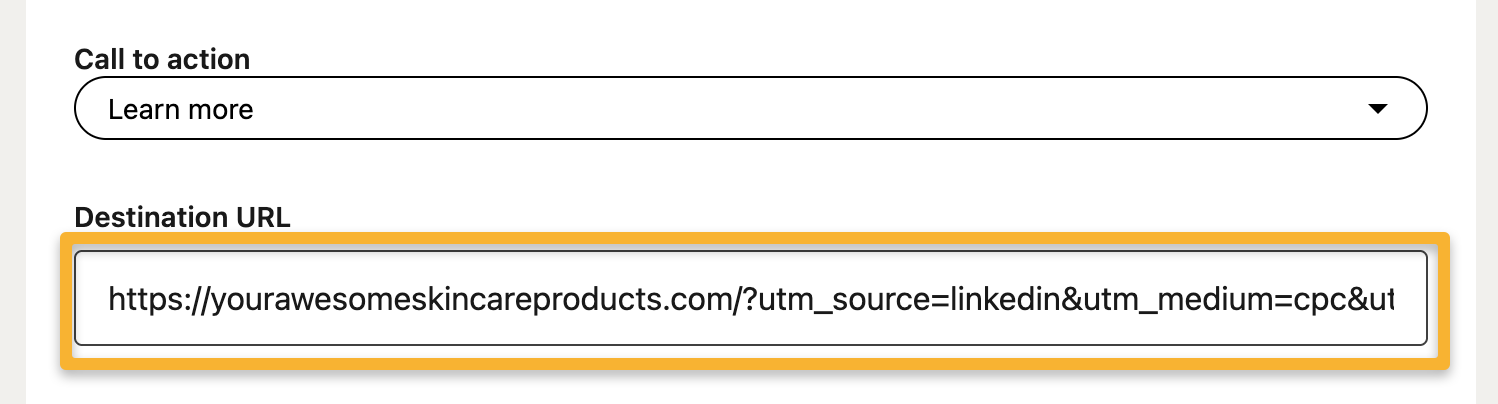
Finally, paste this modified link into the "Destination URL" field for your LinkedIn ad:
Using Dynamic Ad Network Tokens
Ad network “tokens” are dynamic placeholders that can be used as UTM values, in place of a static value. These tokens are then replaced with real values by your ad network each time your ad is clicked. Learn more in the article below:
What are dynamic ad network tokens and how do I use them?
Tracking Lots of Ads using Tracking Templates
The process above describes creating a UTM-powered URL for each of your ads. If you just have a handful of ads it’s quick and easy, with the added benefit of seeing your actual Ad names in ClickMagick.
If you have lots of ads, and don’t mind seeing IDs in your stats e.g. 481737423982 vs. spring-sale-ad, you can use a Tracking Template at the Campaign level so you don’t have to update the URL for each ad. Learn more below:
What is the best way to track lots of ads?
Tracking your Ad Spend
There are three different ways to track your ad spend. You can learn more about that here:
How do I track my Ad Spend?
Article 358 Last updated: 10/22/2025 12:01:32 AM
https://www.clickmagick.com/kb/?article=358